Hardie board siding is the go‑to solution for homeowners who want a blend of durability, aesthetic flexibility, and low‑maintenance performance, and it’s especially popular in regions with harsh weather cycles. By choosing a fiber‑cement cladding system backed by James Hardie’s 30‑year warranty, you secure a protective skin that resists rot, insect damage, and fire while maintaining a sleek appearance for decades. For a smoother decision‑making process, check out our Top 7 Tips for Choosing the Best Siding Companies Near Me – 2026 Guide, which outlines how to vet contractors who specialize in this material.
Why Hardie Board Siding Stands Out in 2026
In the latest National Association of Home Builders (NAHB) 2025 market report, fiber‑cement products captured 18 % of the new‑construction siding market, up from 13 % in 2022. This surge reflects three core advantages:
- Weather‑resistant cladding: The engineered composition of cement, sand, and cellulose fibers gives Hardie board a density that repels moisture and tolerates temperature swings from -30 °C to 45 °C without warping.
- Fire rating: Rated Class A fire‑resistant, it meets the stringent International Building Code (IBC) standards for wildfire‑prone zones, a decisive factor for homeowners in the Western United States.
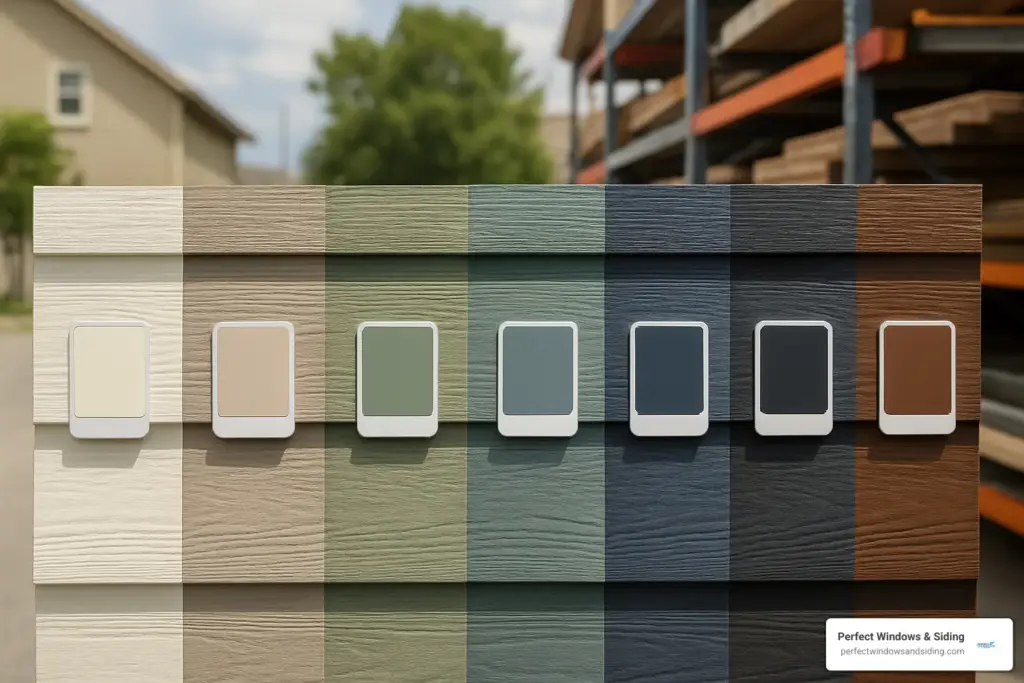
- Design versatility: With a range of textures—from smooth lap to deep shiplap—and a palette of over 150 factory‑finished colors, it competes directly with vinyl and wood alternatives.
Environmental Impact and Sustainability
Hardie board’s composition includes 50 % recycled content, and the manufacturing process consumes 30 % less energy than traditional wood siding, according to a 2026 study by the U.S. Environmental Protection Agency. This makes it an attractive choice for green‑building projects seeking LEED certification.
Table of Contents
- Why Hardie Board Siding Stands Out in 2026
- Environmental Impact and Sustainability
- Choosing the Right Hardie Board Product for Your Home
- Step‑by‑Step Guide to Installing Hardie Board Siding
- 1. Prep the Substrate
- 2. Measure and Cut
- 3. Apply the Starter Strip
- 4. Fasten the Panels
- 5. Seal and Paint
- Common Mistakes and How to Avoid Them
- Real‑World Case Study: A Mid‑Century Modern Renovation
- FAQ – Hardie Board Siding
- Is Hardie board siding fire‑proof?
- How long does Hardie board last?
- Can I paint Hardie board myself?
- What maintenance does Hardie board require?
- Future Trends: What’s Next for Fiber‑Cement Siding?
- Conclusion
Choosing the Right Hardie Board Product for Your Home
James Hardie offers three primary series, each suited to specific project scopes:
- Hardie® Plank Lap: Ideal for traditional colonial or ranch‑style homes, this lap siding mimics the look of painted wood while delivering superior durability.
- Hardie® Panel Siding: A vertical panel system perfect for modern façades, providing clean lines and a contemporary aesthetic.
- Hardie® Board™ Trim: Used for corners, fascia, and decorative accents, ensuring a seamless finish throughout the exterior envelope.
When deciding, consider the climate zone, architectural style, and budget. For example, the Panel Siding series has a higher upfront cost but can reduce long‑term labor because it requires fewer seams, a factor highlighted in the Vinyl Siding 2026: Ultimate Guide for its comparative analysis of installation times.
Step‑by‑Step Guide to Installing Hardie Board Siding
Even though professional installation is recommended, understanding the process helps you evaluate contractor quotes and ensures quality control.
1. Prep the Substrate
Start with a clean, flat sheathing surface—typically ½‑inch plywood or OSB. Apply a weather‑resistive barrier (WRB) such as Tyvek® to prevent moisture intrusion. In regions with high humidity, a vapor‑permeable WRB can mitigate condensation issues, a point emphasized by the Building Science Corporation in its 2026 moisture management guide.
2. Measure and Cut
Use a 9‑inch circular saw equipped with a carbide‑tipped blade to cut the panels. For intricate cuts around windows or vents, a jigsaw with a fine‑tooth blade reduces chipping. Always wear a dust mask; cutting fiber‑cement releases silica particles, which are hazardous if inhaled.
3. Apply the Starter Strip
Attach a starter strip along the bottom edge of the wall using corrosion‑resistant screws. This ensures a level base and provides a drainage plane.
4. Fasten the Panels
Secure each board with Hot‑Dipped Galvanized (HDG) or Stainless Steel screws, spacing them 12 inches apart. Follow the manufacturer’s recommendation of 1‑¼‑inch penetration into the sheathing. Over‑driving screws can crack the board, so use a screw gun with torque control.
5. Seal and Paint
Hardie board comes pre‑primed with a polymer‑based sealer, but a topcoat of 100 % acrylic paint enhances UV resistance. According to a 2025 test by the ASTM International, acrylic paint on fiber‑cement retains 95 % of its color intensity after 10 years of exposure.
Common Mistakes and How to Avoid Them
- Skipping the WRB: Without a proper barrier, water can seep behind the siding, leading to mold growth. Always install a WRB as the first layer.
- Using the Wrong Fasteners: Stainless steel is essential in coastal areas; regular steel will corrode quickly, compromising the board’s integrity.
- Improper Cutting Technique: Cutting without a dust collection system can create airborne silica. Invest in a vacuum‑equipped saw or have a professional handle the cuts.
- Neglecting Expansion Gaps: Hardie board expands and contracts with temperature changes. Leave a 1/8‑inch gap at corners and around openings to avoid buckling.
Real‑World Case Study: A Mid‑Century Modern Renovation
In March 2026, a 2,500‑sq‑ft home in Portland, Oregon, underwent a full exterior makeover using Hardie® Panel Siding. The homeowner reported a 40 % reduction in annual maintenance costs compared to the previous wood clapboard, as documented by the local home‑owners association’s 2026 sustainability report. Moreover, the property’s resale value increased by 7 % within six months, a statistic echoed by the National Association of Realtors when analyzing siding upgrades.
FAQ – Hardie Board Siding
Is Hardie board siding fire‑proof?
Hardie board is Class A fire‑rated, meaning it does not contribute to flame spread and can act as a barrier against fire penetration for up to 30 minutes, meeting the International Fire Code (IFC) requirements.
How long does Hardie board last?
When properly installed and maintained, the siding can exceed 50 years, with the manufacturer’s warranty covering material defects for 30 years.
Can I paint Hardie board myself?
Yes, but use a high‑quality acrylic paint and follow the priming guidelines. For best results, apply two coats, allowing at least 24 hours of cure time between layers.
What maintenance does Hardie board require?
Routine cleaning with a garden hose and mild detergent once a year is sufficient. Inspect for cracked caulk around windows and repair any damaged panels promptly.
Future Trends: What’s Next for Fiber‑Cement Siding?
Industry analysts from Statista predict that by 2028, fiber‑cement siding will account for 25 % of all residential exterior cladding in the United States, driven by rising awareness of fire safety and sustainability. Emerging trends include:
- Integrated insulation panels: Hybrid systems that combine Hardie board with rigid foam to improve R‑values.
- Smart coating technology: Self‑cleaning nano‑coatings that repel dirt and reduce the need for power washing.
- Custom texture molds: 3‑D printing techniques enabling unique surface patterns without additional labor.
Staying ahead of these developments can help homeowners make smarter, future‑proof decisions for their exteriors.
Conclusion
Hardie board siding offers a compelling mix of durability, fire resistance, and design versatility that makes it a top choice for modern home improvement projects. By understanding the product options, following best‑practice installation steps, and avoiding common pitfalls, you can enjoy a low‑maintenance, weather‑proof exterior for decades. Whether you’re renovating a historic bungalow or updating a new construction, the fiber‑cement solution stands ready to protect and beautify your home.
Ready to start your project? Begin by selecting a reputable contractor—refer to our comprehensive guide on choosing siding companies to ensure a flawless installation from start to finish.
